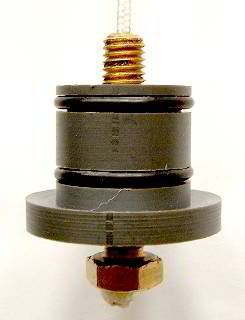
PropTop - inexpensive propeller balancer
Why do you need to check (and correct) the balance of your propeller?
Because an unbalanced propeller causes excessive vibrations that are unpleasant and harmful to the pilot and may be destructive to the engine and framework, potentially leading to structural failure.
When do you need to check your propeller's balance?
- Any time you feel more vibration than you are accustomed to
- After any long period of storage
- After any damage to the propeller, including small nicks and chips
- After any repair work or repainting or varnishing on the propeller
- After the propeller has been exposed to high moisture (flying in cloud or rain?)
- After attaching any decals or tip-protective tape to the propeller

|
The Xplorer Prop-Top is used to quickly and accurately
check and correct the balance of your propeller.
Features:
- Inexpensive, every PPG pilot should have one
- Compact, convenient to keep in your toolkit
- Quick to set up and use
- Easy to check and correct your propeller balance
- Accurate balancing
- Adjustable sensitivity to suit your needs
- Multi-axis, checks tip-to-tip (spanwise) and edge-to-edge (chordwise) balance
- Two O-rings to compensate for slights variences in 1 prop's inch hole (due to humidity changes)
|

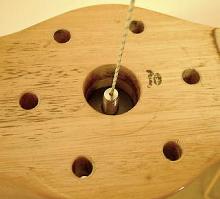
The top side of the propeller hanging on the PropTop. The tip of the bolt is the fulcrum or pivot-point around which the propeller will position itself. The pivot may be raised (by turning the bolt clockwise) to lower sensitivity, or lowered (anti-clockwise) to increase sensitivity.
|
How to use your Xplorer PropTop
- Work indoors away from wind and breezes.
- Close windows and doors, switch off fans and air conditioners.
- Find a suitable attachment to hang the Prop-Top by its cord.
- Locate a position that presents a convenient height to work on.
- Insert the PropTop into the One-inch hole in the propeller hub.
- Ensure you insert from the face of the prop that is usually against the motor.
- The bolt-tip should be towards prop face where the mounting bolts usually are.
- Now hang the PropTop from the attachment point above.
- Turn the sensitivity-adjustment bolt all the way into the hub (clockwise), raising the pivot point well above the center of gravity of the propeller
- This is the least sensitive position. The propeller should hang nearly perfectly flat, even if slightly out of balance.
- Increase the sensitivity by turning the bolt anti-clockwise, lowering the pivot.
- As you increase the sensitivity, the propeller will tilt towards its heavier side.
- Notice not only tip-to-tip tilt, but also any edge-wise rollover of the propeller.
- If you turn the bolt out too far, eventually the pivot will be below the center of gravity and the propeller will fall over in any direction.
|

The underside of the propeller with the PropTop fitted. Here the sensitivity-adjustment bolt is turned all the way in, raising the pivot point to its least sensitive position.
|
Ways of correcting the balance. Any, or a combination of:
- Using sandpaper, remove a light layer of material from the heavier side over a large area. Then repaint or varnish the surface and re-check the balance.
- Using clear overcoat, apply a light layer of a suitable protective paint or varnish, on the lighter side of the propeller. Apply thin layers over a large area. Allow to dry then re-check after the volatiles evaporate.
- Add a decal to the lighter side: Remove the backing layer and lay the decal upside down on the blade, then move it around until the propeller is better balanced. Turn the decal over and stick down in that position.
Remember to check along the short axis too... an imbalance across the blades is as severe as along the blades.
|
Some more notes on using the Prop-Top:
The Pivot-Point (PP), which is the critical part, is the tip of the bolt.
To ensure that the line exits the very center of the bolt-tip, the hole is
drilled from that side. It is done in a lathe, with the bolt turning and
the bit stationary, this is to ensure that it is absolutely dead center in
the bolt-tip.
It is impossible to keep the drilled hole dead center down the
length of the brass bolt from that point onwards, but that is not important
at all. The fact that hole exits slightly off-center at the bolt-head is
irrelevant and does not affect its performance as a ballancer. The mass removed off-center is too small to register at such a tiny radius from the center.
To use the Prop-Top, first screw the bolt deep into the plug, so that the
bolt-tip protrudes out a long way. This is the least sensitive setting.
Insert into the propeller and hang in an area free of wind and moving
machinery.
As you turn the bolt out gradually (by turning it counter-clock from
below), you increase the sensitivity. As you bring the prop more and more
into balance, you can keep increasing the sensitivity.
Essentially, you are lowering the Pivot Point (PP) with respect to the
Center of Gravity (CG) of the entire prop.
If you screw the bolt out too far, the PP will fall below the CG and the
prop will flop over in any/every direction.
Its best to start with a relatively insensitive setting and gradually
increase the sensitivity as you work on the prop.
A few tips:
Look not only at the spanwise imbalance (tip to tip) but also at the chord-
wise imbalance (side-to-side).
i.e. if one blade is higher than the other, AND the prop leans over to one
side as well, add some weight to the lighter blade, on the higher edge
only.
e.g. if using spray-paint to add weight, spray all along the actual leading
or trailing edge only, to get the prop to roll onto an even keel first
(chordwise), then add some paint near the tip to correct the spanwise
balance.
Using less weight at a higher radius from the dead-center has the same
affect as more weight at a lower radius.
e.g. adding 10 grams at 10 inches radius has the same affect as adding only
5 grams weight but at 20 inches radius.
It is easy to correct spanwise balance by adding a small amount of weight
near the tip of the lighter blade, however chordwise balance is much more
difficult to correct, because the prop is very narrow and you cannot get
much radius out to the side.
For this reason, first concentrate ONLY on chordwise balancing, until the
prop leans neither left nor right at a high sensitivity setting on the Prop-
Top.
If the prop is severely out of balance in its chord, you need to add a LOT
of weight to one side, more than just adding paint!
A common practice is to drill a small hole and fill with molten lead. If
the lead is too heavy, simply drill a smaller hole down the center of the
lead until enough has been removed for correct chordwise balance.
Some guys simply pour small lead shot into the hole until almost balanced,
than seal the hole with lightweight epoxy or wood-filler or shellac.
After sealing the hole, further refinement in chordwise balancing can be
done with paint.
After the chordwise balance is corrected, only then work on the spanwise
balance.
One quick way to make a quick spanwise correction, is to add a decal to the
lighter blade. Remove the backing layer of the decal to expose the
adhesive surface. Place the decal on the lighter blade, but with the
adhesive side UP! (i.e. so that it does NOT stick to the prop!).
Look at the spanwise balance with the decal lying loosely on the prop.
You can now slide the decal further from or closer to the center to find
the optimum location for correct balance. (further from center will lower
that blade). Then simply turn the decal over and stick down at that
location. Rub the decal hard and thoroughly all over to fully activate the
adhesive surface, which is pressure-sensitive. A light spray of clear
paint around the edge of the decal will help prevent it lifting off the
prop in use, by preventing the air from getting under the decal edge.
Remember that the prop-tip could experience "wind" of several hundred Miles
per hour!
Wait for the paint to dry (while hanging on the Prop-Top) then re-check the
balance. Paint dries as the volatile components evaporate, leaving the dry
paint lighter in weight than wet paint.
You may need to touch up with some extra paint again to bring the prop back
into balance to account for the evaporated loss.
|
Available from: Xplorer UltraFlight, Cape Town, South Africa. - Email: info@xplorer.co.za
Return to Xplorer Homepage
|
|

